| Home | Newsletter | Locations | Diary |
|
Indexes |
|
|
|
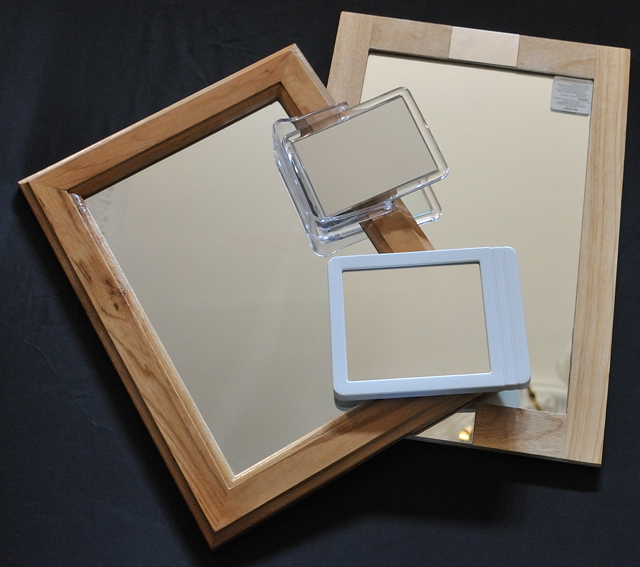
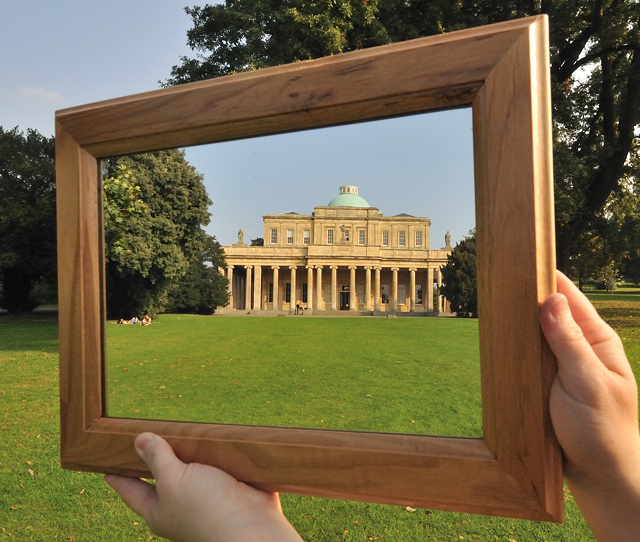
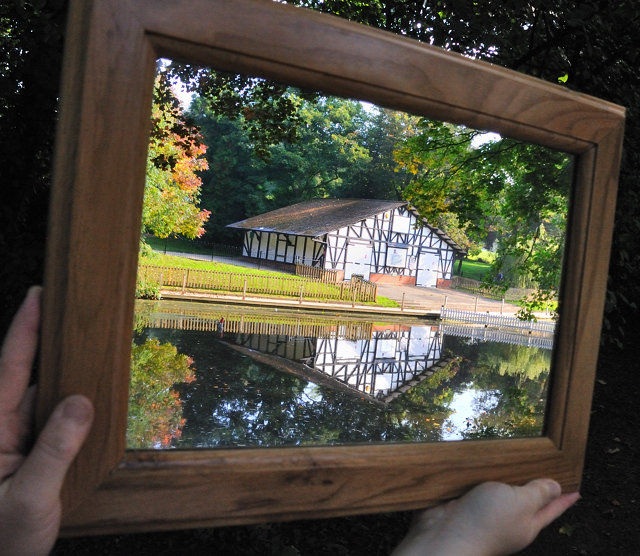
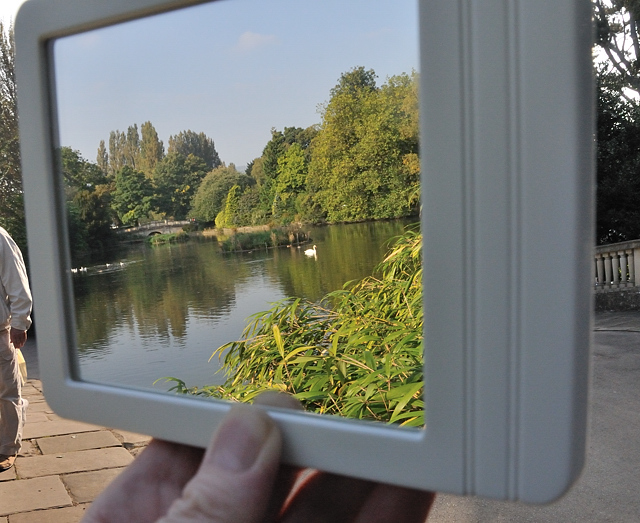
Article Developing the Eye - Mirror ExerciseBorrowing a Technique from History At a point in history, when many of the better off visited scenic places in Britain, and before most could, they were encouraged not to look directly at the scenery, but to use a device that was a mirror on a handle and to view it then over their shoulder. By this approach they had lifted the scene out of nature and given it a fixed shape. Far earlier a number of the major artists taught that to appreciate a view or topic one should view it using a mirror. Today if we're teaching you as a potential landscape artist, we would most likely start by viewing the image in this way. We would look at composition, lead in lines, effect of colour, tone and shape, and of course what was happening to the light. As a photographic artist, we also want to develop these same skills, and to understand the same areas. We need a Mirror For this exercise you need a rectangular mirror, it can be large, medium sized or small, the best size is one that can be easily lifted and carried, but is large enough to provide a decent view. Rather than just use one of the mirrors we have here, we decided to go into Cheltenham and get some new ones for this exercise. While you need only 1 or perhaps 2, we bought 4, just so we could experiment more, they ranged in price from a pound (£1) up to six pounds (£6), (September 2008). The two cheapest were smaller mirrors, one a shaving mirror, the glass measured only 5 inches in its longest direction. The other small mirror, just slightly smaller, on a plastic stand sold for putting on makeup, the two larger ones are in wooden frames designed to hang on the wall, with the glass measuring 12 and 14 inches on their longest sides. All are plain mirrors not magnifying ones.
We chose these because they would not have sharp edges and therefore would be safe to handle. We could have gone to a glass outlet that cuts glass and mirrors and got a mirror of any size and then bound the edges in some way or framed it for safety, but this would have taken longer and also been more expensive. We wanted to undertake this exercise with what you could get cheaply and easily in just about any high street. I have not been able to find an equivalent to the one used historically anywhere, including internet sites. The old design was a rectangular mirror, wooden backed with a wooden handle, and probably around 7 or 8 inches from memory. No, I wasn't around at the time, but I have seen it written about, although I can't lay my hands on anything on this, at this time. So what do we do Take a mirror, and use it to look over your shoulder at the view behind you, it could be your garden, a large scenic view or anything else. You will find you have lifted a part of the image out of the scene, isolating it as the mirror has edges.
The image, as you would expect, is back to front. This perhaps helps to make it more of a picture and less like just looking. You will find as you move the mirror towards you, you get a larger part of the scene included, and when away from you far less. Its not like zooming a camera lens, as there is no perspective change, such as closing up of subjects, more like sectioning a photograph. With large mirrors you may not be able to limit the size of the view sufficiently without someone else to hold it for you or using an artist stand to hold it. As you experiment with this technique, indoors and out, you will see different images, can look at different positions, have lead in lines and more. You should also notice while using this technique items that you might well have overlooked, perhaps the flare on a window, the difference in brightness between different areas of the shot, and how your eyes are pulled about in all directions to look at the image.
Our objective is to notice things, the composition, the lighting, shadows, reflections, flare, and to develop rapidly 'an eye' taking years off the learning curve. Use a mirror in this way a number of times, in different locations, in different lighting conditions. You are not going to learn a lot in a few minutes, but several days, an hour at a time, and you will notice the difference in the way you "see" photographic opportunities, spot, in advance, problems and start to use opportunities. As you compose your images with the mirror, notice perspective, what is upright and what is not, when items are straight and not, what you are cutting off at the edges and how you can move to improve this image. The mirror image is large, bright, far clearer than a camera and with no technicalities involved. It can allow you to concentrate on the basic compositional opportunities while at the same time starting to notice other factors that will affect your photographs.
Even a small mirror can be used effectively If you have been taking photographs for some time, you will still benefit from this exercise. There is today, the scope to use a screen on the back of a point and shoot camera or liveview on a DSLR to see an image before taking it, but this is such a small image and outdoors even the best is challenged by the light. Another compositional exercise uses the
framing technique
See Also: Photograph
Composition -
Introduction
|
||||||
|
||||||
| . | ||||||
|
||||||
|
|