Article
Pinhole Cameras
Pinholes old and future
No one knows who made the first pinhole
camera, the techniques involved have been used for longer than recorded
history. There are ancient caves with upside down paintings of animals that
are thought to have been painted using a pinhole effect and paint on the
images.
One of the earliest life forms that still exists today is the
Nautilus
 a sea creature whose eye has no lens, and functions in the same
way as a pinhole camera with water going through the pinhole. a sea creature whose eye has no lens, and functions in the same
way as a pinhole camera with water going through the pinhole.
History records pinhole cameras from many
years BC, and at points ever since. The largest completed pinhole camera was
a converted F-18 hangar at the closed El Toro fighter base in Irvine,
California, USA. The pinhole was 1/4 inch, and the recording made 80 feet
away, with an exposure of 35 minutes, the resulting print was 108ft by 85ft,
processed in tanks the size of an Olympic swimming pool, with 600 galleons
of developer, 1200 gallons of fixer and two fire hydrants with hoses used
for the wash.
The pinhole camera is not just something
from the past, the largest pinhole camera ever has been commissioned by NASA
in February 2008, known as the
new worlds mission,
at a cost
of $3 Billion, a dedicated visible light telescope optimally designed for
the task of finding and photographing new planets, the existing earth
telescopes being the viewing and recording end.
|
 |

Two pinhole camera images taken with a
Nikon D300, no lens, but a piece of card with a pinhole instead , see
how it was done at
A pinhole for your DSLR

|
| So what is a
Pinhole
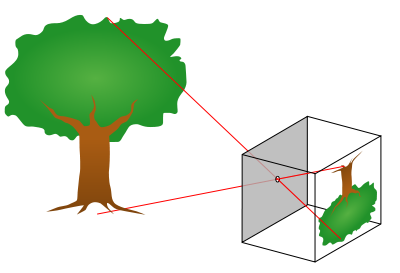
Camera As light travels in
straight lines, if you have a small enough hole in a wall, then on a
screen or surface in a darkened room you get an image displayed. The
image is upside down and back to front.
Although there does appear to be evidence
of ancient image making using light sensitive material most of the time
a man was in the box or room and painted or drew over the image that he
could see. The smaller the hole,
the dimmer the image, but also the sharper it is. Ideally the pin hole
should be less than 1/100 of the distance from the pinhole to the
screen or wall where the image is projected. |
 |
There are
two points to watch:-
-
An
extremely small hole can produce a significant diffraction effect and a
less clear image due to the wave properties of light.
-
As the
diameter of the hole approaches the thickness of the material in which it
is punched, significant vignetting occurs, as less light reaches the edges
of the image. This is due to the sides of the hole shading the light
coming in at anything other than 90 degrees. Again this is perhaps less
likely to occur in our DSLR experiments than with a larger format camera.
While formats like the DX format, used by most Nikon cameras, are ideal for
most applications, with pinhole photography large formats will produce
better results, simply because they don't need slowing up as much, so using
a 10x8 inch plate camera with film or paper will produce a similar
quality that is 10x8 to the small sensor size of a digital camera. As
materials are expensive and immediate results not available for these you
need a pin hole of known size and then you are able to use look up charts
or calculators to get the exposure. You will find links to information
relating larger formats, optimum designs and calculators in the
pinhole cameras - further
information
page, however here we want to look more at what we can do with DSLR, and
preferably fast and at minimal cost.
Commercially Produced Pinholes
There are a number of people producing
pinholes that you can use with your camera, we have some contacts and
details of what they offer at the end of
pinhole cameras -
further information.
For initial experimentation kitchen foil can be used, and some prefer
this, the only down side is that the holes are of an unknown size and
even ones from the same needle are quite different. So if we wanted to
experiment more then perhaps in order to tie down variables to known
sizes we could use one or more pinholes that we bought in. See
Pinholes from the
Pinhole
Factory
for information on one set that we have used. We also have a gallery
exhibiting images taken with one of the adaptors from the Pinhole
Factory - see
Stanton Drew Stone Circle - Pinhole
Gallery.

Depth of field is not a problem
With pinhole photography, there is no
depth of field
, everything is as sharp as every other part. So you can have a
flower in the foreground and castle in the background and they are both is
focus.
How large is the image
The image through a pinhole is about 150
degrees across so very wide, the resulting image area is about 3.5 times
the distance from the pinhole to the screen or sensor. So you
are unlikely to run out of image area.
Getting the
Exposure
You can calculate the effective f stop for
the pinhole camera by dividing the size of the hole by the distance
between the pinhole and where the image appears. Usually the f is a
very large number, for example imagine a pinhole camera where the hole is
0.25mm and the length from the pinhole to screen is 100mm then you get
f400, more than 9 stops dimmer than f16, so requiring an exposure
more than 9 stops or 512 times as long. It does mean that if you know,
using a camera or exposure meter what the exposure would be you can get a
fairly good guess at what the exposure with the pinhole camera will be.
You can calculate the f number sequence for
stops by doubling the one before last, so in this example we get 16, 22, 32, 44, 64, 88, 128, 176, 256, 352. Stop difference in shutter speed
are far simpler being the doubling of time, so if the exposure on the meter
or camera, or by sunny 16 rules suggested f16, 1/250 sec at ISO 250, then
the exposure would be 2 seconds.
The problems you will discover is in
measuring accurately the size of the pinhole, and even if you use the same needle
point to produce a number, they will all vary. With sunlight outdoors and
reasonable
ISO
settings of 640 or 800 I have had good results with as short
an
exposure
as 2 seconds, while indoors with poor reasonable lighting it has
been on occasions up to 20 seconds.
If you want to get the exposure
experimentally I suggest that outside you start with an ISO of 400 and
exposure of 5 seconds. If it is too light, reduce the exposure length if too
dark then increase it. If you want to achieve this by looking at the curves on
the camera, then try and keep them in the left two thirds, moving to the
right by increasing the exposure length and to the left by decreasing it.
Why use it
It won't produce you a quality that you can
seriously compare to what you could get with a quality lens, although you
can make acceptable images. See the two images at the top of this page,
they are magical, considering no lens was used, but not very sharp. While
you may improve on this, you are not gong to ever get images that match
what you could get with a quality lens. You may,
on rare occasions, find that you can take photographs with this technique
that you could not otherwise, perhaps to get both a telephoto effect and
unlimited depth of field, or perhaps to correct the
perspective
stopping
buildings from leaning. This is explained in
Using a pinhole to
simulate the rising front on a camera.
The main reason to use it is in
understanding photography better, getting a better grasp of how things
work and gaining more control.
Some of us also may answer, just because we
can.
Putting pinhole photography into
practice Besides fun photography,
today pinhole cameras are used for Solargraphy, looking at the movement of
the sun over a period, for photographing and looking at eclipses, and with
pinhole cameras being used in security and discreet filming, as they are so hard
to detect. A
camera
obscurer,
may use the
same technology, often with mirrors, to project an image of something
outside onto a dish in a room, but some are far simpler pinhole cameras. Some
pinhole cameras have film or photographic paper that is exposed, but today
we can also record the image with a digital camera.
You can create a simple pinhole camera
yourself in minutes, so as to optically see the effect, see the article
the Pringle tube pinhole camera ,
although this does not record an image, those who have not seen this
technology before will find it exciting and most children think its magical.
You can also buy kits that allow you to
build a pinhole camera, see
Pinholes from the pinhole
factory,
on these.
Your DSLR can also be operated as a pinhole
camera quire easily, and we have articles covering different aspects
of this:-
The articles above use stationery and
kitchen items, without any expenditure, however if you want to get some
very low cost items to explore further you could consider purchasing a
Pinhole Adaptor
this is connected using a T2 adaptor instead of a lens and is a small
ready to use device. The pinhole is in the centre, as you would expect.
If you get on well with pinhole photography
and decide it merits further experimentation then we have a suggested design
that you may like to have a go at, this is made mostly of mountboard, as
used for framing photographs. In the article Pinhole
Kit Mk3
we
have a project to make a device that allows you to change the pinhole
and also to slide in vertical or in any other direction you choose. We use 4
bought in pinholes, but these are not expensive. Getting a variety of
telephoto images with this is possible by using it in combination with a set
of tubes. A sketch of the design with dimensions is in a
PDF file
 available
from this article. The pinholes we are using for this are explained in the
article
Pinholes from the pinhole
factory,
information on where to get both the pinholes and the pinhole adaptor, as
well as prices is at the end of
pinhole cameras - further
information. available
from this article. The pinholes we are using for this are explained in the
article
Pinholes from the pinhole
factory,
information on where to get both the pinholes and the pinhole adaptor, as
well as prices is at the end of
pinhole cameras - further
information.
See Also:
Pinhole
Photography Section

A pinhole for your DSLR
Pringle tube pinhole camera
Pinhole Kit MK3
Pinhole Adaptor
Pinholes from the
Pinhole
Factory
Pinhole
Cameras
- Further Information
Stanton Drew Stone Circle - Pinhole
Gallery
|