| Home | Newsletter | Locations | Diary |
|
Indexes |
|
|
|
|
|
Article How to Photograph Waterfalls - 3
<< Back to how to
photograph waterfalls
<< back to how to
photograph waterfalls 2 - shutter speed
Exposure It is easier to photograph a waterfall on an overcast or cloudy day then in bright sunlight as there is less contrast and no heavy shadows to have to deal with. If you have D-lighting on your camera, then setting this will reduce the effect of too much contrast on a sunny day, but make the image too flat on overcast days, but if you take it with this on, increasing the contrast in editing overcomes this. You can use normal matrix metering, check the curve, look for highlights and adjust to get the images right, in most cases you will find you need to have a small amount of negative correction, with a Nikon on matrix metering maybe EV-0.7, other makes will vary. If you switch to spot metering you can meter either off the water or vegetation. With spot metering the camera turns whatever you point at as the equivalent to mid grey and green grass or foliage is often about right with no correction. If metering off the water you will find the image too dark, and you need to add a positive correction probably around EV +1 to EV+1.7, but check the highlights are not showing as being burnt out, if they are then turn down the positive EV correction.
See the
Exposure Section
White balance
It's best to use
PRE
You may see a difference in the colours between areas in the shade and in
sunlight, and you could choose with the
manual white balance
Depth of field
With the
speed
When using slower shutter speeds to blur the water you need the rest to be
sharp or it can look as if the whole picture is out of focus in a major way.
To be able to select the ideal speed and aperture you have to use
ISO
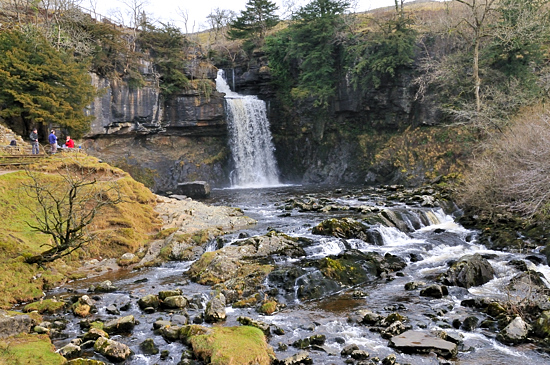
Perspective There are many views and perspectives that can be obtained of waterfalls, and while much is open to your own interpretation, there are a number of considerations that would make your work more predictable. We need to get the camera level in all ways, you don't want a waterfall where the water is sloping or a waterfall that is leaning back. This is a natural fault to develop with larger waterfalls, in an attempt to fill the frame with the waterfall rather than foreground detail. You can overcome this by using a wider lens, and keeping the camera level, then sectioning the image later if you don't want as much foreground. Another possibility is to go further away if there are no obstacles and use a telephoto lens to get a better perspective with it framed more tightly, however you have to watch the amount of mist or haze that is coming off the waterfall as the increase in distance and therefore haze can have a detrimental effect.
Ingleton Waterfall Trail - River Twiss, Yorkshire
A longer lens can also be used to close up
items in your photograph so that several features are in the same
photograph, but you then have to think far more about the
depth of field.
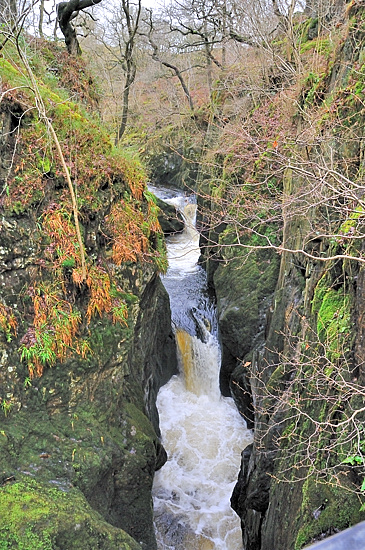
For some photographs rather than the whole falls you will want to isolate a section with close crop or telephoto lens. With these photographs you need to think about what the centre of interest is in the composition and the way the eye is brought into the image with the watercourse, trees, or rocks. Minimising water spots and a misty lens When you are near a waterfall there is often a lot of spray or mist coming off, and this can travel some way, often showing up as water spots on your lens. It can also sometimes condense on your lens producing a misty lens effect. Unfortunately when you take a quick look at the small display on the back of your camera you are unlikely to see this, its not until you take a later look at the larger image in editing that it shows up. You cannot stop the spray, all you can do is to operate in a way that minimises the effect. So having taken an image, take a look at the lens or filter to see if there are water spots present, if there are use a lens cleaning tissue to get rid of them, and try again. If its a major problem then the trick is in the speed of operation, you need to focus and get the setting right and then while holding your finger on the focus and exposure lock quickly sort the lens being careful not to move the focus, and take it quickly. Some photographers find this easier by having decided on the settings, putting the camera into manual mode and setting it up, getting the lens clean and putting a hand over it while turning to face the spray, only removing your hand as you are going to press the button, and by this means minimising the amount of time the spray can get onto the lens. In some cases the spray comes in waves as the wind swirls and you can time removing your hand so that no spray hits the lens.
There is a difference of opinion about using lens hoods while photographing
waterfalls, they make it more difficult to see if there is spray on
the
filter
If you are going to use
Filters
If you are going to take a DSLR into heavy spray, like that found in the
'Maid of the Mist' boats going close to Niagara Falls, then you need a
waterproof guard
Other Considerations
See Also the
Waterfalls Section
|
||||||
|
||||||
|
||||||
|
|